
Woohoo....Technique Tuesday!!!
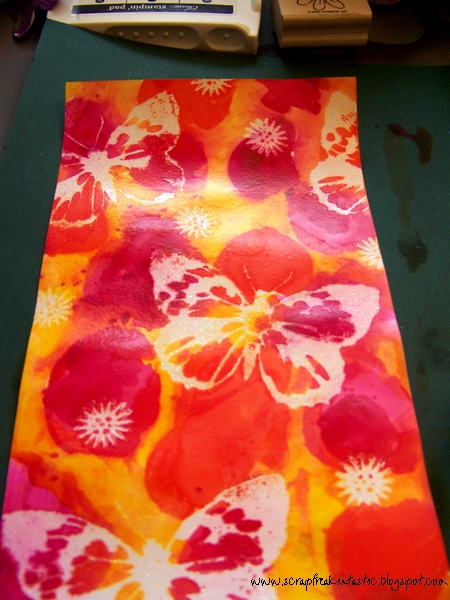
Today, I am showing a technique that is great for making your own patterned paper. This technique is called Emboss Resist. With it, you can create pretties like this:
Today, I am showing a technique that is great for making your own patterned paper. This technique is called Emboss Resist. With it, you can create pretties like this:
You will need:
glossy cardstock
stamps
Versamark
clear embossing powder
heat gun
reinkers
paintbrush
paper towels
wax paper
water
cardstock (optional)
iron (optional)
STEP ONE:
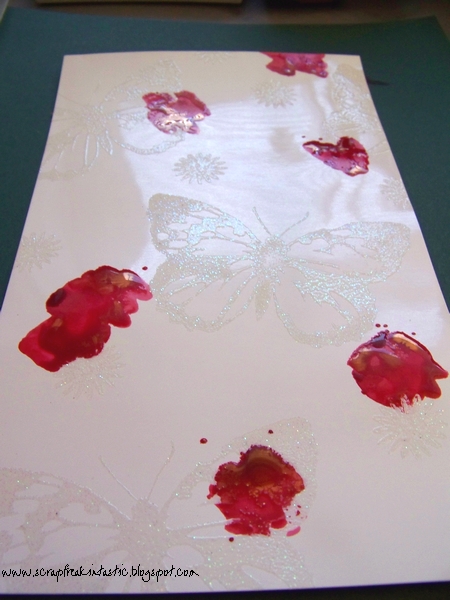
Stamp designs with watermark (Versamark) ink on glossy cardstock. Sprinkle clear embossing powder and set with heat gun. I used holographic embossing powder so there is a bit of sparkle in it.
Stamp designs with watermark (Versamark) ink on glossy cardstock. Sprinkle clear embossing powder and set with heat gun. I used holographic embossing powder so there is a bit of sparkle in it.

STEP TWO:
Squeeze a few drops of reinker onto wax paper - always go darkest to lightest. I used red, magenta, orange and yellow. Dip paintbrush in water; lightly blot on paper towel so your brush is wet but not dripping wet. Dab onto glossy cardstock, smooshing your brush around, going right over top of the embossed images. Notice that the ink resists the embossed areas; the ink will stain and bead up a little giving the look of a watercolor. Repeat in three or four areas on the cardstock as shown.
Squeeze a few drops of reinker onto wax paper - always go darkest to lightest. I used red, magenta, orange and yellow. Dip paintbrush in water; lightly blot on paper towel so your brush is wet but not dripping wet. Dab onto glossy cardstock, smooshing your brush around, going right over top of the embossed images. Notice that the ink resists the embossed areas; the ink will stain and bead up a little giving the look of a watercolor. Repeat in three or four areas on the cardstock as shown.
STEP THREE:
Clean brush very well and change your water - if you don't, your colour will bleed and you will end up with mud! You are now ready to apply the next colour. DO NOT apply ink right next to the first color - leave some space between colours as you will fill in with your final and lightest colour.
Clean brush very well and change your water - if you don't, your colour will bleed and you will end up with mud! You are now ready to apply the next colour. DO NOT apply ink right next to the first color - leave some space between colours as you will fill in with your final and lightest colour.
STEP FOUR:
Apply the last colour (yellow) in between the other colors, sort of like a bridge between two colours. Apply the yellow in the available white space and then overlap some of it into the other colors...the results are layered and blended and quite beautiful! You can let it dry or hit it with your heat gun. Rub a damp Q-tip or paper towel over areas of the embossed design that has ink spots on it to get rid of any ink there.
Apply the last colour (yellow) in between the other colors, sort of like a bridge between two colours. Apply the yellow in the available white space and then overlap some of it into the other colors...the results are layered and blended and quite beautiful! You can let it dry or hit it with your heat gun. Rub a damp Q-tip or paper towel over areas of the embossed design that has ink spots on it to get rid of any ink there.
STEP FIVE: (OPTIONAL)
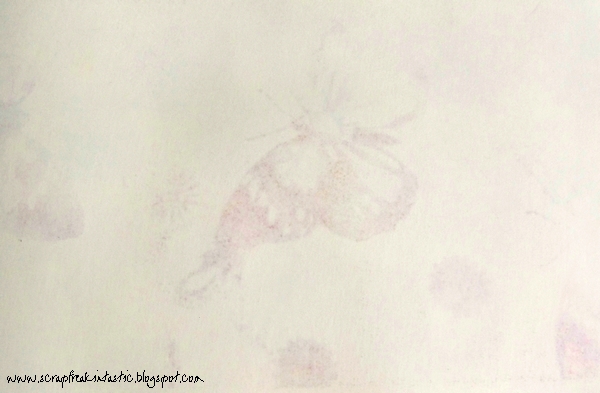
You could be done now if you like the shiny embossed images or if you want to make it look more like patterned paper, simply put the glossy cardstock in between two pieces of white or cream cardstock. WIth a hot iron, iron over cardstock until you can begin to see parts of the embossed images coming through. Keep ironing until you can lift the top sheet of cardstock off without it sticking. What you are doing is removing the embossing now, but it will still leave the white image behind.
You could be done now if you like the shiny embossed images or if you want to make it look more like patterned paper, simply put the glossy cardstock in between two pieces of white or cream cardstock. WIth a hot iron, iron over cardstock until you can begin to see parts of the embossed images coming through. Keep ironing until you can lift the top sheet of cardstock off without it sticking. What you are doing is removing the embossing now, but it will still leave the white image behind.
You now have your own patterned paper! You can stamp on it or use it however you would regular paper... So what did I create? Well, I did a layout (with the Sketch of the Week) and a simple, yet elegant card.

 Now you may have noticed that the second half of my title had something to do with mistakes... well I seem to have made quite a few in the last projects I was creating. My friend Alissa tells me that there are no mistakes in scrapbooking, only opportunity for embellishment....and let me tell you how true that is!
When I was creating this technique, I got it all done and went to stamp on it and the darn acrylic stamp fell of my block and right into the middle of the pretty butterflies! EEK! Well, I managed to salvage a small piece of it and that is how the card came to be! Then, on the layout, I had smudged some ink so that is how the pinkish smudgemarks came to be...yes they were in the sketch but I hadn't intended on putting them there but I am somewhat (did I just say somewhat? Okay, I TOTALLY am ) of a messy scrapbooker...so smudges are nothing out of the ordinary!
Some other mistakes this week...
I made this card for Vicki's colour challenge (brown, green, orange and cream)
 I was happily creating....got almost done....went to stamp the "believe" and darn if I didn't do it totally crooked!!! Grrrrr.... but, it was a piece from my scrap box and the only one in there....so that is how the button and ribbon came to be! And in my opinion, it totally made the card!
And if you have made it all the way to the end of this long post, thanks!! If you would also be so kind as to show me any creations that you make using this technique, I would be so happy, I might even attempt a cartwheel! Annnnnnnnnnd... if you showed me some of your embellishments that were created from a mistake, I would definitely do a sommersault! Definitely!!!!!
Have a scrapfreakintastic week would ya?!
OMGosh! I TOTALLY do what you do with mistakes! I love finding fun ways to cover them up (and I make them ALL the time in scrapping!! If I can find a recent LO/project, I will post and link!) TY so much for the awesome tutorial!
ReplyDelete